Monday, July 29, 2019

Little Changes #9: Resource Allocation Improvements


Introducing bulk allocation of roles to people or people to projects! System administrators will be crying for joy as the management of resources across a portfolio has now been infinitely improved.

In UniPhi 15 you can head into the Resource tab and select a project from the drop-down list.
Resource Tab - Select Project

Once in that Project you will see an Edit button.
Resource, Project - Edit Button
 If you click this button you will then be presented with your entire list of people and the entire list of roles you have for that project.

Resource, Project - List of People and Roles
 You can then easily go through and select any combination of roles a person has on a project, for as many people you have on that project and hit save! A handy new bulk allocation of roles function.

The other bulk allocation option we have created involves selecting an individual person from your Resource list. Once in that contact screen, you can select Projects from the sub-navigation bar.

Contact in Resources - Project Sub-navigation
Once in the Project sub-navigation of that contact, in this case Annie Lennox, click the Edit button.

Annie Lennox - Edit Button
Clicking Edit will present you with a Project Role Matrix for this contact. This matrix lists all the projects in your system and the roles available for these projects.

Project Role Matrix
Then you can simply select what role this contact is for as many projects as this person is in and hit save, which will bulk update that person's project list - nice and easy!

These new bulk update features will help reduce time spent on resource allocation and provide yet another simple user experience.

Friday, July 26, 2019

Major Changes #1: My Work

If you attended the My Work Memoriam you will know that it is now being laid to rest and a new way of working in the system is being introduced. UniPhi 14 and prior had what we originally thought was a clever feature of only including private documents in someones My Work space. This led over the years to our second most comment help ticket..."Where's my document gone". UniPhi 13 made this even more obtuse with the removal of the My Work tab.

Pre-UniPhi 13, there was a My Work tab located in the top navigation alongside My Portfolio and Portfolio.

UniPhi 12 - My Work, My Portfolio & Portfolio Tabs

In this version having My Work made more sense as it was easy to navigate between tabs, however when the new interface was brought out, My Work became a filter chip accessed via a 3 click process in the pop-up modal filter.

UniPhi 13-14 - My Work Chip
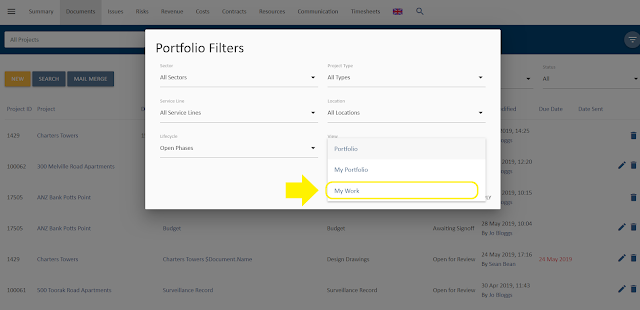
The three click process of accessing My Work is seen below:

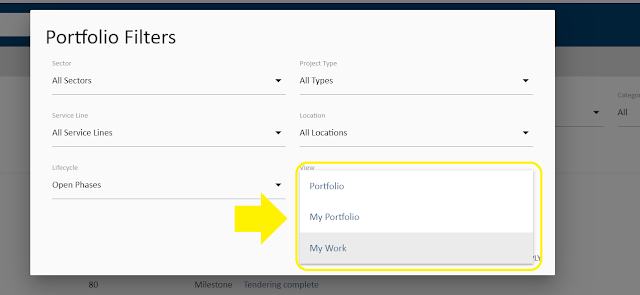
UniPhi 13-14 - Portfolio Modal Pop-Up, View Select
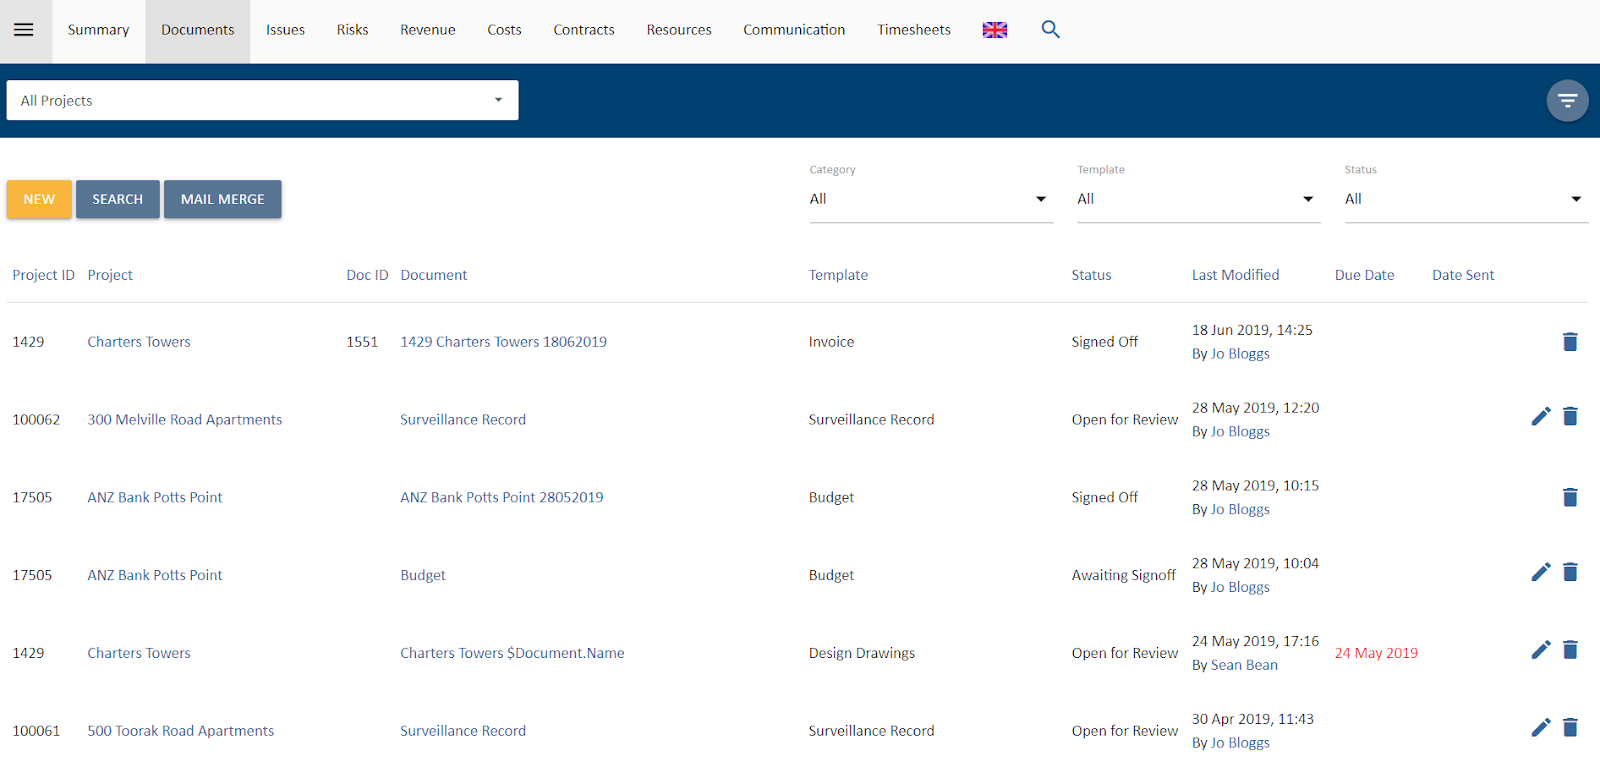
The documents module in UniPhi is unique in that it not only is a container module for unstructured  documents to be shared with the inherent version control and sign off workflow that this implies, but it is also a content generator, integrating all the content that exists elsewhere.

To support a robust process documents in UniPhi follow a publishing workflow. Initially they are private so that the person creating the document can make sure they are happy with the content before others can see it.
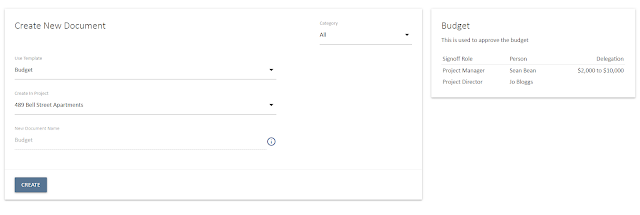
Creating New Document in UniPhi 13-14
For new users, this publishing process takes a bit of getting use to and hence, when they first create a document and do not move the status beyond private, they would struggle to find it again as it was locked away in the My Work section.

UniPhi 13-14 - Document Module Portfolio View

UniPhi 13-14 - Modal Pop-Up, Select My Work View
UniPhi 13-14 - Documents Module in My Work View
These two issues have been the main two drivers around changes to My Work and aside from the fact that taking away another piece of the system always creates a feeling a loss - hopefully the way we have changed this functionality will get a good response. It should make it easier to use our product, especially for new users.

My Work in the Summary Module

Now when you log into UniPhi 15, you will see that you are automatically logged into the My Portfolio view (see the My Portfolio chip).

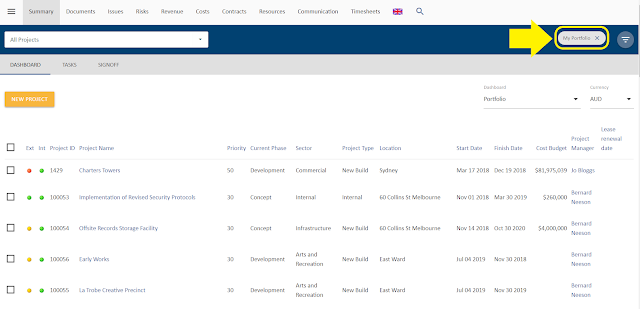
UniPhi 15 - My Portfolio View
This view will give you the usual dashboard of My Portfolio which has all the projects you are working on, usually a smaller list than the main portfolio list. The first new addition to replace My Work functionality is Tasks and Sign Off the sub-navigation.

UniPhi 15 -  Summary Sub-Navigation: Tasks & Signoffs

Additionally there is now no My Work in the modal, only My Portfolio and Portfolio, which have moved to being a radio button select option (will be expanded upon further down).

UniPhi 15 - New Pop-up Modal with no My Work

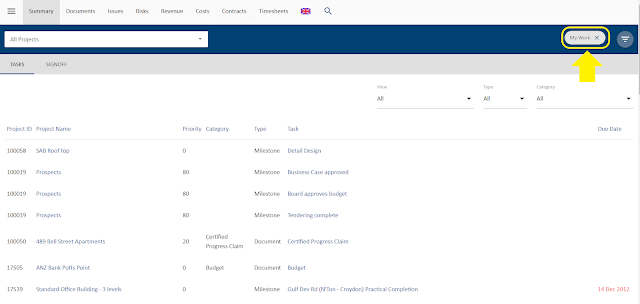
When you click into Tasks, you will see the tasks of everyone working within your portfolio.

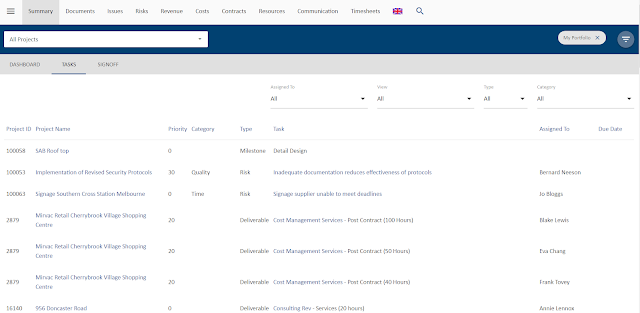
UniPhi 15 - Tasks Screen
To view your own tasks, select your name from the "Assigned To" drop-down.

UniPhi 15 - Assigned To Drop-Down

This will give you the exact same view as the My Work Summary that existed before and you can toggle between managing people or managing your own work through that process.

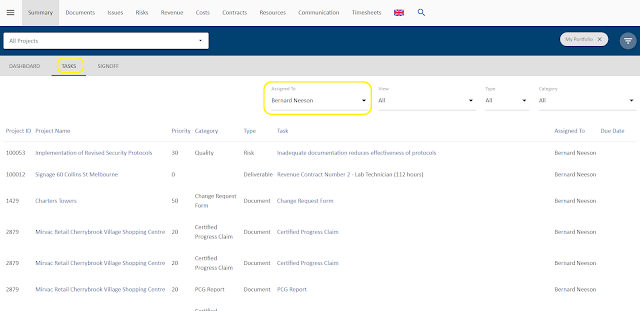
UniPhi 15 - New My Work Screen
For CEOs and senior general managers, you can bookmark this page and log straight into Sign Offs to review and sign off documents that need approval.

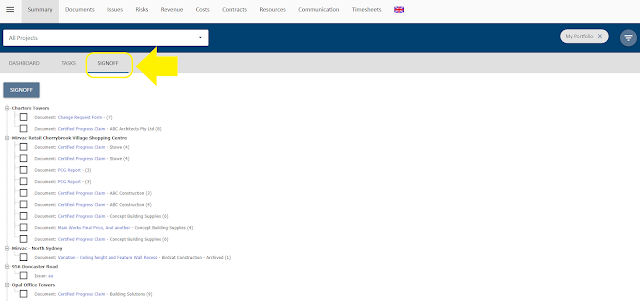
UniPhi 15 - Sign-offs

This has now reduced these functionalities down to one-click once getting into the system as opposed to the four clicks it was previously.


My Work in the Documents Module

How we have handled this change across the rest of the system, is that we have just brought in a filter within My Portfolio.

For example, when you go into Documents, you will have all your Private status documents in your list.

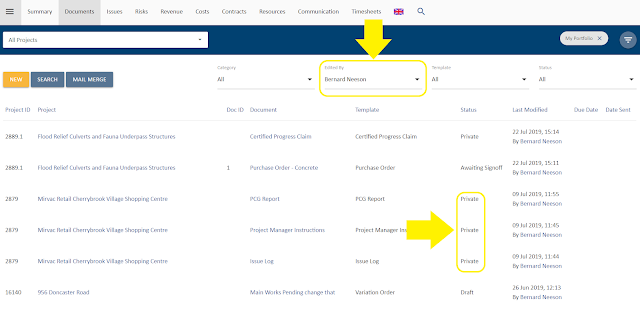
UniPhi 15 - Documents Module
This is because the Edited By filter defaults to your own name, giving you the exact same screen as the My Work Documents screen.

This filter can also be used to filter to all documents or by user, so you can toggle between views.

Now if you create a document and don't finish it immediately, it will just appear in your list and doesn't require any tacit knowledge about how to find a secret list.

Obviously, if someone else accesses the same project, they wont be able to see your private document as they are pre-filtered out, solving a 15-year old support ticket problem.


My Work Throughout the Rest of the System

Going across each module in the system, you will see the same concept. 

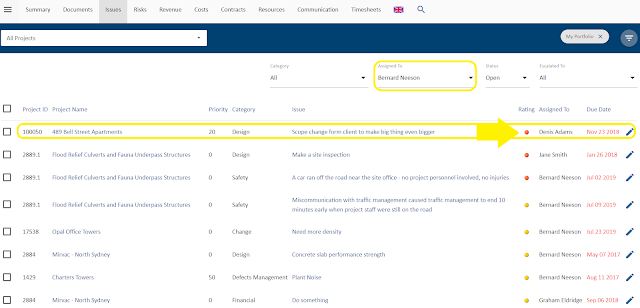
In Issues you filter the Assigned To filter to yourself to get the My Work screen.

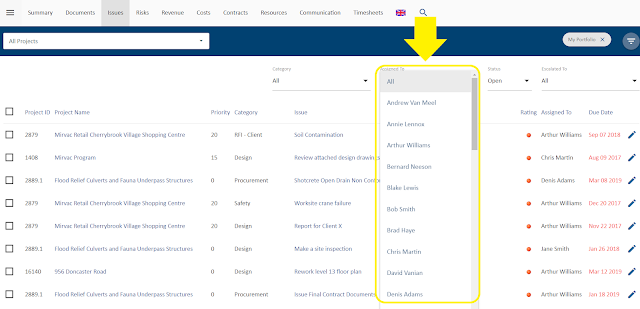
UniPhi 15 - Issues Module, Assigned To Drop-down
This screen will include any Issues where you have an action assigned to you, whether the overall issue is assigned to you or not. For example in the screen below where the issue belongs to Dennis Adams or Jane Smith.

UniPhi 15 - Issues My Work Screen

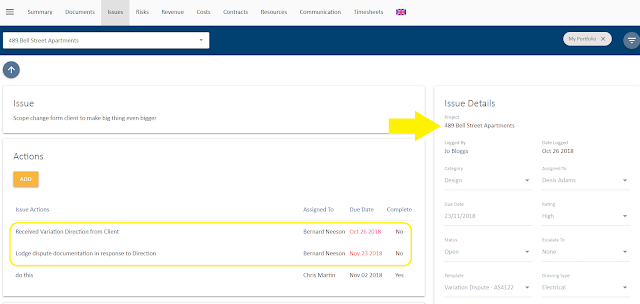
UniPhi 15 - Individual Issue with Actions


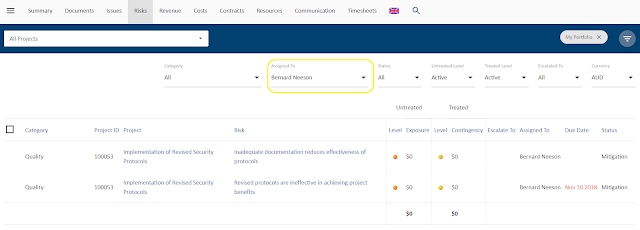
The same thing happens within Risks. When Assigned To is filter to yourself, you will be presented with all risks, including the ones where you have been assigned a mitigation step.

UniPhi 15 - Risks Module
So when you are in My Portfolio and you are checking the Assigned To yourself filter, you are getting all of that information. That filter also exists within the Portfolio view, as portfolio managers might also want to look across the portfolio and view which tasks exist, for who and when due.


Third & Final Change

The third and final change we've made to My Work mainly effects Revenue, Contracts, Costs and Issues and is an enhancement around the modal.

This change has to do with the ability to see the projects where you are in a certain roll.

For example, when logged into the Contracts system as a program manager you have a bunch of projects that you can see contract values on.

Then if you went into a random project and click on a contract, you get the details on that contract but you may not be able to add a new variation or create a progress claim on it as you aren't a program manager on that project.
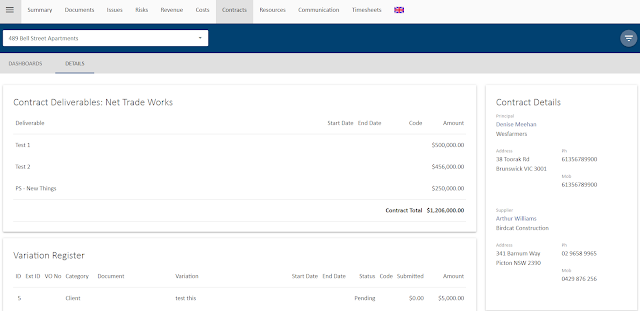
Contract that User can't edit
This is something we get a lot of feedback on as people want to simply see the contract they can manage. 

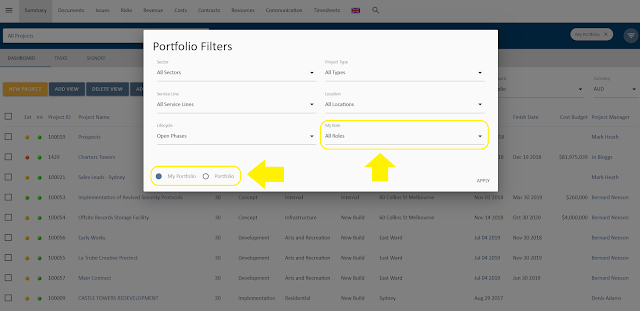
The way that we have provided a solution to this came about from the drop-down in the modal looking a bit silly without My Work. This is particularly true for those with project manager or team member access levels as they only have My Portfolio. Therefore to solve this, we have introduced a radio option button in the white space to the left to toggle between Portfolio and my Portfolio.

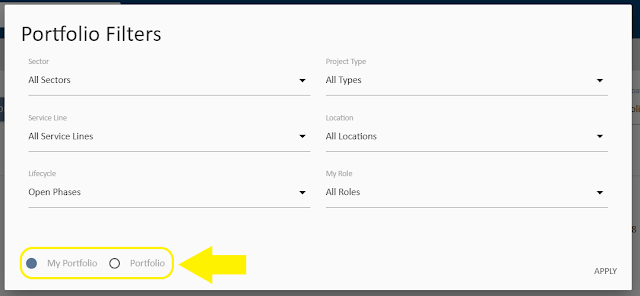
UniPhi 15 - New Modal Radio Buttons
Users simply have to tick the button of their choice.

Additionally, the filter has now been replaced with a My Role filter.

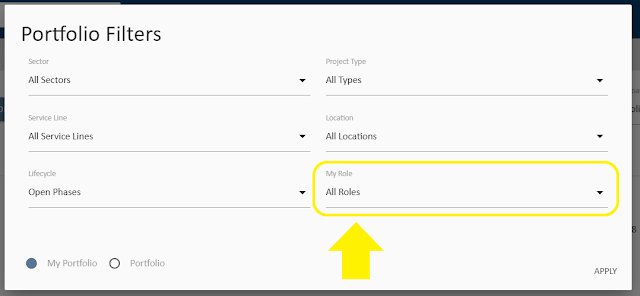
UniPhi 15 - New My Role Filter
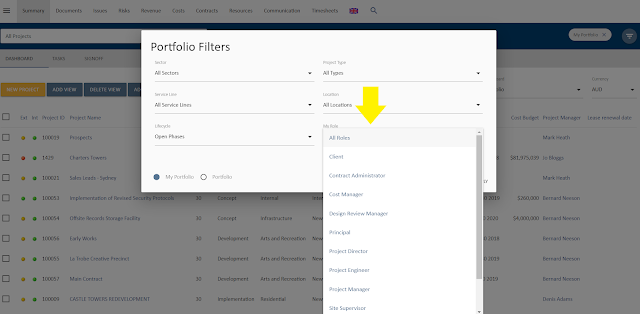
UniPhi 15 - New My Role Drop-down and Select
This drop-down will list all of the roles you have in in UniPhi, be it a project manager, job captain, project lead, design lead or whatever other title you've been given to manage a project. You will then be able to select that role from the drop-down list, click apply and then be presented only with issues, risks, revenue, costs and contracts of projects that you can actually do stuff on, edit, add, etc, solving the issue of viewing projects you can't edit. 

Monday, July 22, 2019

Little Changes #8: Capture a submitted variation value

Our 8th little change to the system is in the Contracts module. A small change, but an important one for our project management consulting clients. The change relates to the variations card and allows a consultant (or client of construction services) to capture what a contractor has submitted as their variation, as well as what you have approved.

The Submitted value shown in the screenshot below and represents the suppliers submitted quote to the variation price request and the Amount column is what you are actually approving as a variation to adjust the contract sum.
Contracts Module - Submitted Value & Amount
Then through PowerBI or reports (to be released as part of UniPhi 15) you can present an aggregated view of what value you added as a project manager in terms of what you screwed the contractor down to with regards to what they thought the variation was going to cost them tow hat it ended up costing.

Another simple thing we've added is the To Complete column in various screens:

Contract Module - To Complete Column

Contracts Dashboard - To Complete Column
The To Complete column is simply the difference between the Progress Claim and the Estimate at Completion for that particular contract. This enables you to see what's left both at a contract level and at the bottom line contract level for the project.

Come back tomorrow for the next installment in all things UniPhi 15.

Wednesday, July 17, 2019

Little Changes #7: Cash Flow Phasing

A simple but big improvement that we have made to the Cost module is for Cashflow Phasing. What we've brought into the product now is the ability to enter in percentages, so using these filters are very important when doing cashflow.

To highlight these changes we will go through cashflow phasing done against  contracts. This can be done against codes as well, but that can all be done within the cost module which was something we brought in in UniPhi 13.

In this screen, areas that are grayed out are actuals that have been closed. This screen will also present all the contract that now exist in the project you are working on and their deliverables.

What are you now able to do in the system, which may work more for consulting contracts than main works, is if you know that you have milestone claims that are going to be made and will be consistent across the deliverables, is you can now phase it out using percentages. This will also be a big thing for our practice management users as they've got their own revenue contracts that they then claim across all deliverables in one month.

To phase your cashflows by percentages, what you first need to do, is change the Unit drop-down from Currency to %, which is new in UniPhi 15.

Unit  Drop-Down - %
This means you can now key in percentages across the months as to what the claim value for that deliverable will be and automatically phase it across your claim period. For example if you if you know the claim value will be 20% for one month and the months after you simply enter 20% across that time period.

20% Phasing
 Once entered, hit save and the system will automatically calculate 20% of the $10 million to phase that information out.

Phased Variance
Then if you are happy with that being what is going to happen to all displayed deliverable, you can simply tick the box and select Fill Down. The tick boxes normally means that there are hidden buttons that are going to appear, which is something that came in in UniPhi 13 and alerts users to hidden functionality that can be selected when ticked.

Fill Down & Save
 The 20% will then come down into each code and once you click save, the cash flow of that contract will have automatically be phased.

20% Phased 
You can then revert the screen back into Currency and see the dollar values that are coming in on a month by month basis.

Unit Drop-down - Currency

Phased $ Value
This is just one of the cool little functions that we feel will be pretty popular in UniPhi 15 and may, in certain circumstances, sur-plant the auto-phase function that we enhanced in UniPhi 13.

Tuesday, July 16, 2019

Little Changes: #6 Copy Paste Importing from Excel

A new import method we've been having a lot of fun with is the copying from Excel method. This was initially introduced in UniPhi 14 for updating cash flow and periodic custom fields and has now been expanded into 15.
The traditional import method has been the uploading of files, be they excel or csv to the system and then pressing save.
Import From Excel Function

Import From Excel Function - Browse File

The issue with this is that the result is a black box to the end user who has no idea whether the data has imported successfully or not. Even with good error handling the user is only ever presented with cell or row references of issues. The copy and paste function presents instant visual feedback to the end user. For those that missed this update in UniPhi 14, here's how cash flow phasing can be brought into the Cost Module.

To begin you simply need to go into the Phasing sub-navigation of the Cost module, select the relevant chart of accounts from the Cost Code drop down list and then Budget, Forecast or Actuals from the Phase drop down list (highlighted below). Note, Actual will only be available for project cost chart of accounts if accounting integration has been configured.

Phasing Cashflow Budgets

Then from an excel spreadsheet you can copy the data required - this data can be as ugly as you like as the system will just pick out the necessary bits from it. With the data copied, simply go to the paste from Excel screen.

Paste From Excel Button
Select forecast or budget from the Import drop down. This will already have Actuals that are being managed from the contracts.

Paste From Excel - Import Drop-Down

Depending on how you've configured the application you can then paste the values selected in from the excel cashflow into the budget.

UniPhi will then ignore columns that don't mean anything to the system and will match codes to pre-existing ones, for which you can have as many as you like. UniPhi will also match dates to the months and periods you are putting them into and if there is a gap in the data or something it can't match, it just won't highlight it.

For example in the image below, UniPhi has ignored columns 1, 2 and 3 and has matched the CF to the CF code within UniPhi. You can also see that the empty columns have been grayed out.

Data Pasted From Excel
The big red box it puts around something is the way in which the system tells you that an account code does not exist. In this exampled Total does not exist, but you can simply ignore that as it does not matter.

Additionally, if there is a typo, you can change it within the pasted function instead of having to go back to excel, update and then copy and paste again.

To finish, you simply tick the line that you want to bring in and click save. It will then automatically put the cashflow in the budget against the relevant codes for the months that you have highlighted.

Data to be Imported - Tick Box
Our benchmarking cashflow is based off the actuals of past projects, so if you've got that data and those profiles, you can quickly get them into the system using this paste from excel function. It's a quick way to get data uptake and portfolios of cashflows into the system that we hope will be useful for our users.

In UniPhi 15, this copy past functionality has been expanded to include resources.

The copy and paste functionality for resources uses the following workflow:

1) Go into Resources and ensure All Projects is selected or the Paste from Excel button won't appear.
Resource Module - All Projects

2) Copy the relevant Resource data from your excel file
Excel Resource File - Copy Data

3) Click the Paste From Excel button
Paste From Excel Button

4) Paste data into UniPhi. Any unrecognized data will be highlighted in grey.
Data Pasted From Excel

5) For unrecognized data you can map the column by selecting a UniPhi related field from the drop down box
Resource Filter Drop-down Box - Select Contact Name
 6) Map all the columns to the relevant fields and tick the lines of data you want to import. Any data left in grey will be ignored when imported.
Filter Categories - Drop Down Lists

7) When happy with your selection, click Save.
Save Button
8) Your resource data will now have been automatically brought into UniPhi!

The next big improvement that we have made is in the Cost Module will be released tomorrow so check back in to find out what that is!