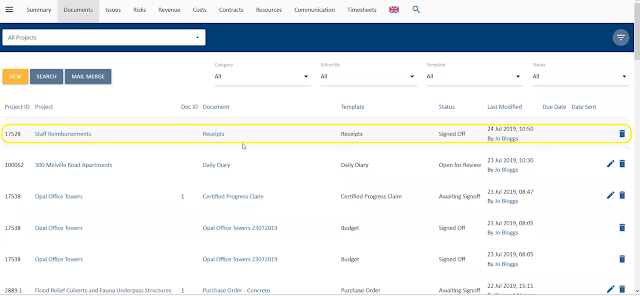
We've now added the capability to log work expenses to your timesheets which can then be submitted to approval. This change covers the end to end process for staff reimbursements, starting from capturing receipts into their phones, logging the expense claim into the system and getting approval for that to potentially claiming that expense to your client for reimbursements.
Step 1 - Capturing data to your mobile or web application
The first step in claiming an expense is to capture the data into your mobile app by directly taking photos or web application by sitting down and bulk uploading files. To do this create a Staff Reimbursement project in UniPhi.
Then go into the project and create a document.
Upload receipt images into this document and keep adding to it until you are ready to make a claim.
When happy with all your receipts, sign-off that document and if in mobile, sync it back to your deployment.
Once back in the web application, or if already working in it, you can go into the Documents tab and see that the staff receipts document has been brought into the system. From this screen you can manage your expense documents, naming them with your name to differentiate them or by creating sub-projects for each staff member depending on the scale of the business.
 Step 2 - Submitting the Claim for Approval
To submit the claim for approval, you then need to go into the timesheet system.
Now in the Timesheet system and Expense option has been added to the sub-navigation bar and if you go into this section you will be able to add a claim.
 |
| Expenses Sub-navigation |
Then select the right cost codes, which for most deployments there will only be one, as well as the expense code.
Save this into the system with the right $ amount. At the moment this is an ex. GST amount, with plans to expand it to handle both.
 |
| Adding Expense |
 |
| Adding Detail to Expense Claim |
When you have entered all the claims you have, it is then time to create a Claim Approval document which can be reached through the link in the screen under Claim Approval Templates.
 |
| Expense Claim Approval Template |
Clicking the link will create the document that will have been auto-named and show who needs to approve it. This is configurable to your requirements and so your system administrator will be the one to configure who has the sign-off role for expense claims.
Make sure that the project selected is Staff Reimbursements, not the one you are claiming against, as if you do not create it in the Staff Reimbursements project you wont be able to view and embed the receipts claim document you created previously.
 |
| Select Staff Reimbursement Project |
Finish the document and flag it as awaiting sign-off. This will then automatically notify the person who needs to sign it off.
Once that person gets the notification, they can then view the document, see the expense claim they are putting through, the receipts and the digital signature.
 |
| Digital Signature - Add |
 |
| Digital Signature - Added |
If everything is in order, that person can then sign of that document and that claim will be added to that particular project for possible reimbursement.
Step 3 - Claiming that Reimbursement from Clients
Once a staff claim has been approved to a project, it can then be submitted to a client for reimbursement. In order to do this, the person who is in charge of invoicing will have to go into the Contract module. From there they select the contract that that expense claim has been allocated to. Claims could be made across multiple projects and can appear in as many projects as you like but but only the portion that was claimed against that project will appear in the following section.
Going into a revenue contract (in this example Services), you can raise an invoice as you would normally do on a monthly basis.
 |
| Contracts Tab - Services |
Normally this would be to claim your services revenue under your contracts deliverables and variations but now you are able to do your expenses by clicking the Expenses button in the Contract Disbursements section.
 |
| Services Contract - Contract Disbursements |
 |
| Claim or Dismiss Expense |
 |
| Select Revenue Code |
 |
| Create Invoice - Template |
This will create the document, bringing in the Skybus expense claim in the tax invoice.
Furthermore the receipts document created can also be embedded into the invoice, bringing full circle to the end-to-end cycle of capturing receipts, signing them off and claiming those reimbursements from your clients.


1 comment:
I think this is an informative post and it is very useful and knowledgeable. therefore, I would like to thank you for the efforts you have made in writing this article. Claim creation and submission
Post a Comment